|
Topic: Sales > Working with Sales Orders For very small businesses that may not have a separate warehouse operation it may be possible to simply use the Sales Order document as a mechanism for picking and packing the orders. Moreover you can also use the original Sales Order as a Delivery Note/Packing Slip.
For larger businesses, typically with one or more warehouse operations, this mechanism is usually too simplistic for a number of reasons :-
These more complex Pick-Pack-Ship work-flow scenarios cannot easily be handled using the basic Sales Order document. So in order to represent the specific Pick-Pack-Ship of either a whole or partial Sales Order you can use a Shipment document. The Shipment document represents either all or a subset of the line items of a Sales Order that you wish to Pick-Pack and ultimately Ship to the customer.
So for example, if you had a Sales Order where half the order could be allocated immediately, and the rest was put on back order; you could create a Shipment for the allocated stock, and Pick-Pack-Ship straight way. Then when the back ordered stock was available you could create another Shipment document to Pick-Pack-Ship the remainder of the order.
Some things to note about Shipment documents :-
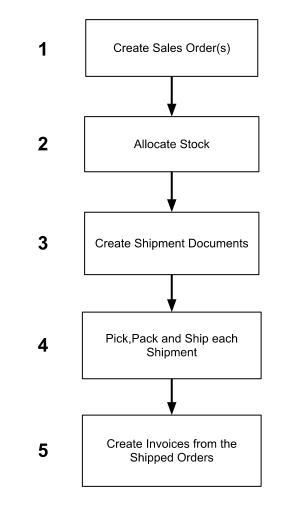
Basic Pick-Pack-Ship Work-flow
The basic steps in Pick-Pack and Ship are shown below. Obviously different companies will have variations on this theme, and your system can be tailored or customized to accommodate your particular order processing work-flow. Each step in the diagram is explained in more detail below.
1. Create Sales Orders Sales Orders can be created in a number of different ways, for example :-
Depending on the way they have been created the associated Stock may or may not have been allocated to the Order. For example, if the Order was created via a shopping cart it is likely that it has a status of PENDING, meaning that the stock has yet to be allocated. Conversely, the Order may have come in over the phone and the stock may have been automatically allocated when the order was first saved. If your work-flow requires an explicit allocation process this is dealt with in step 2.
2. Allocate Stock As mentioned above this step is for those orders that require stock to be allocated. This can be done in a number of ways. For more information see Allocating Stock to Sales Orders
3. Create Shipment Documents Once the stock has been allocated the order is then ready to Pick-Pack and Ship (of course the Order can be put on hold so that this stage can be halted if required). As described above this is done by creating Shipment documents from each of the allocated orders. Note that if the order contains line items for multiple warehouses, a separate shipment document will be created for each warehouse containing only the relevant line items.
4. Pick, Pack and Ship each Shipment Each Shipment document is used to control the Pick-Pack and Ship status of each line item. In fact when a Shipment document is created from an Order the associated line items in the order are set to In Shipping. This means you can tell which orders are currently being Pick-Packed and Shipped at the line item level.
The Shipment document itself has a status that reflects the current stage of the Pick-Pack-Ship process. These states are as follows :-
The Shipments List allows you to see at a glance what states the various Shipments are in. This allows the warehouse operation to simply use the Shipments list to control all Pick-Pack-Ship activity.
Note that from the Shipments list you can print of Pick Lists either by Order or by Item. Also you can print off Delivery Notes/Packing Slips.
When the Shipment is set to Shipped it automatically updates the Shipping Status on the associated Order. The orders Shipping Status can be one of :-
4. Create Invoices from Shipped Orders Once the Shipments have been Shipped Invoices (or Cash Sales) can be created for each of the Shipped orders. This can be done individually from each Order, or in bulk from the Sales Order List.
Using Pick-Pack and Ship in your system
Enable Pick-Pack-Ship Before you can use the Pick-Pack-Ship functionality you must enable it in your system. To do this go to Setup->Configuration->Shipments. Then make sure the Enable Pick-Pack-Ship checkbox is checked.
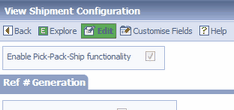 Enable Pick-Pack-Ship functionality.
OK, so the above description gives the basic theory of how Pick-Pack and Ship works. What we want to do now is show how this is done within your system. To do this we will take you through a simple example that shows each of the 5 steps above in action. First though you must enable Pick-Pack-Ship functionality in your system.
1. Create Sales Orders As a simple example we have created 5 Sales Orders, and not allocated any stock to them. So for example these orders could have come in either through a shopping cart, or via the telephone. The picture below shows the orders listed in the Sales Order list.
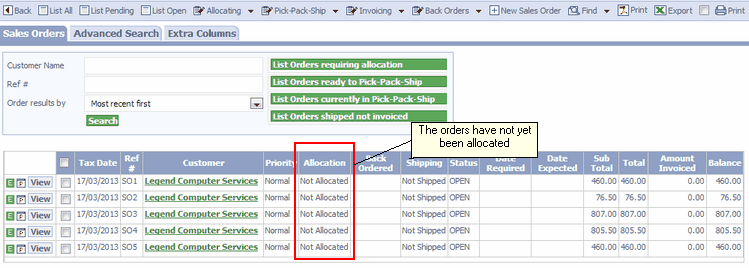 Initial un-allocated Sales Orders
2. Allocate Stock We now need to allocate stock to the orders. This can be done on a per order basis (see Allocating Stock to Sales Orders ). However it is much more efficient to allocate stock via the sales order list, especially if you are dealing with 10's or 100's of orders at once. To make this process quick and easy you can click the List Orders requiring allocation. This not only shows the orders that require allocation, but also indicates which orders can be allocated with the current stock levels, as show in the picture below.
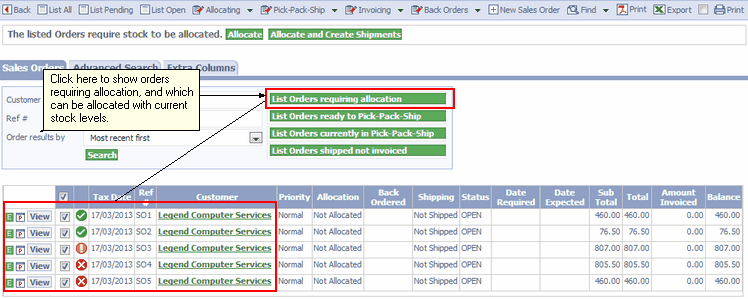 Show orders that require allocation
Next to each order you will notice a circular icon which indicates if the order can be fully, partially or not allocated with the current stock levels. If some orders cannot be allocated due to lack of stock you can put the associated orders on back-order and automatically create the required Purchase Orders. For more information on back-orders see Creating Back Orders
So we have out list of orders that require allocation, and we can see that 2 can be fully allocated, one can be partially allocated, and 2 cannot be allocated at all. To make things quick and easy your system has pre-selected all the orders for the next anticipated operation, which is to allocate the stock and create the associated Shipments, ready for Pick-Pack and Ship.
3. Create Shipment Documents You will see at the top of the page two buttons Allocate and Allocate and Create Shipments; these buttons operate on the selected orders. In this example we are going to allocate and create the Shipments in a single click. This is very convenient when you are processing many orders and want to get them shipped as quickly as possible.
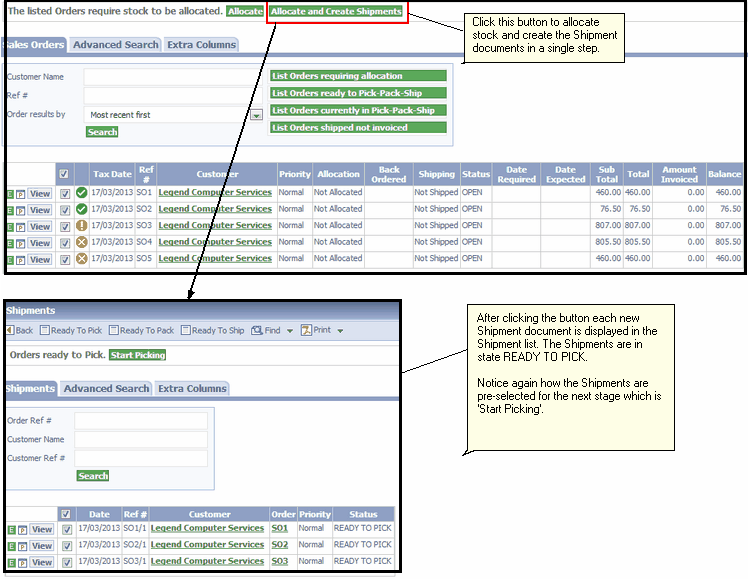 Allocating and Creating Shipments in a single click
Of course you can actually do this operation on an order by order basis if required (i.e. order allocation and the creation of the Shipment document can be done from the Sales Order document itself).
4. Pick, Pack and Ship each Shipment We now have 3 Shipment documents ready to Pick-Pack-Ship. This can all be done from the Shipments List. Indeed, if you have separate warehouse operations then in theory this is the only list that needs to be visible for warehouse operators (this can be done by configuring a specific Role).
The Pick Pack-Ship process in its most general form needs to account for not only the Pick,Pack Ship states but also when Shipments are being Picked, being Packed and being Shipped. This ensures that, for larger warehouse operations, there is no risk of confusion and duplication of activity. For smaller operations these intermediate states may be too pedantic or cumbersome. In this cases certain stages may be omitted if required.
As discussed above each shipment goes through the following states :-
In a similar way to the creation of Shipping documents from Sales Orders the Pick-Pack-Ship process has been optimized so that each state transition for a list of documents can be done with a single click; and again, as with Sales Orders, the same functionality can be accessed via the Shipment document itself.
The following steps 1 through 6 show how the list of Shipments in our example are taken through each state.
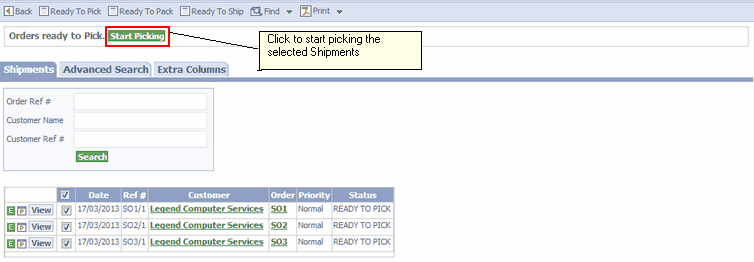
STEP 1: Start Picking The starting point is the list of Shipments that are in state READY TO PICK. To start picking these Shipment simply click the Start Picking button, which will send you to Step 2.
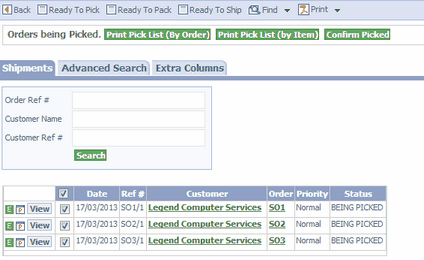
STEP 2: Being Picked From Step 1, each of the orders are being picked. Note that from this page you can print off the pick lists for the selected Shipments either by order or by Item. When the Shipments have been picked clicking on the button Confirm Picked will set the Shipment states to READY TO PACK.
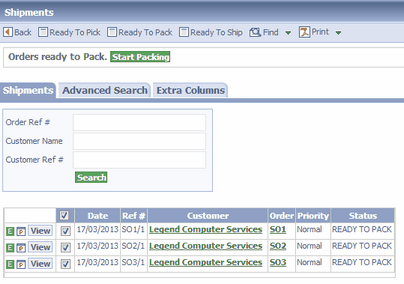
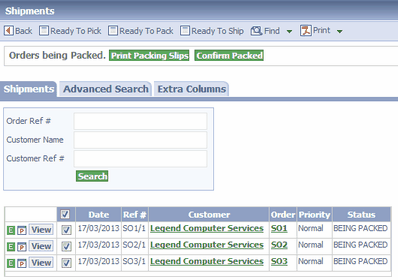
STEP 3: Confirm Picked, ready to Pack From Step 2, each of the orders are now ready to pack. Click on Start Packing to set the Shipment states to BEING PACKED.
STEP 4: Being Packed From Step 3, each of the orders are being packed. Note that from this page you can print off the Packing Slips (also called Delivery Notes). When the Shipments have been packed, clicking on the button Confirm Packed will set the shipment states to READY TO SHIP.
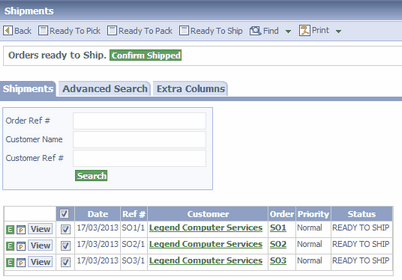
STEP 5: Confirmed Packed, ready to Ship From Step 4, each of the orders are now ready to ship. After the Shipments have actually been physically shipped (or put in goods out for example) Clicking on the button Confirm Shipped will set the status of each Shipment to SHIPPED.
STEP 6: Confirmed Shipped From Step 5, now that the Confirmed Shipped button has been clicked all the shipments have state SHIPPED. Moreover the associated Sales Orders will have the Shipping Status appropriately set. So for orders where all line items have been shipped the order will have status Shipped, and for orders that only have some line items shipped the status will be Partially Shipped.
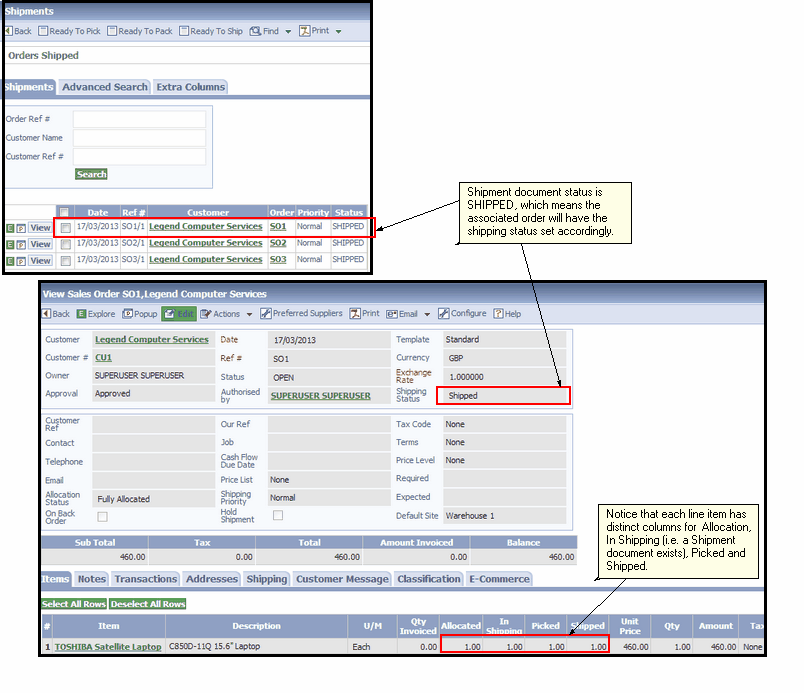 Shipment documents and corresponding order status
5. Create Invoices from Shipped Orders OK, to recap - we had some Sales Orders which had no stock allocated. From the Sales Order list we both allocated stock and created the associated Shipment documents with a single click. From the Shipments list we then took each Shipment document through the Pick-Pack-Ship process. When the Shipments were finally confirmed SHIPPED the corresponding Sales Order shipping status's were set to either Shipped or Partially Shipped accordingly.
Now the orders have been shipped we now typically want to create the associated Invoices (or Cash Sales depending on you business process). Again this can be done in bulk from the Sales Order list.
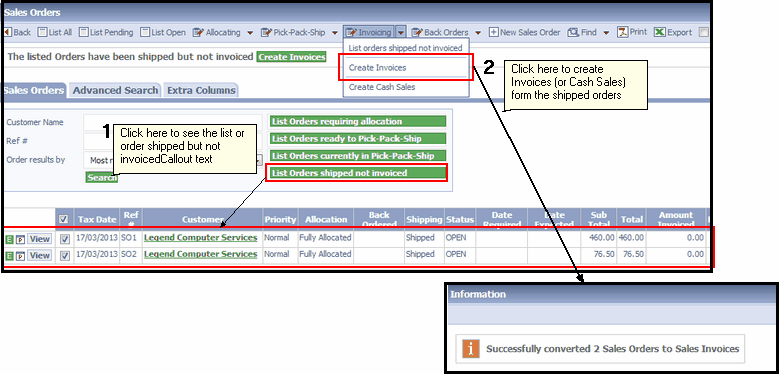 Creation of Sales Invoices from shipped Sales Orders
Summary We have seen how the Pick-Pack-Ship process works in general, including allocation of stock. Although in the general case this process may seem complicated, in fact it can be executed from using just the Sales Order and Shipments lists, and usually with single clicks to move whole batches of Shipments from one stage to the next. So in practice it is a very efficient process.
As stated we have shown the process being executed from the lists of documents. The same result can be achieved by using the actions on individual Sales Order and Shipment documents, which may be practical if the order volume is low.
Order Processing Work-flow Automation And finally, it may have occurred to the reader that some of these stages could in theory be automated. For example, the allocation of stock, creation of shipment documents and creation of the invoices. Indeed there are several Plugins available to automate these steps and make the order processing work-flow almost completely automated. This means your system can be set up to potentially deal with hundreds of orders a day with minimal manual intervention. Please contact Customer Services for more information.
Related tasks and information | ||||||||||||||||||||||||||||||||||||||||||||||||||