|
Topic: Setup
Roles allow you to configure the access to data and functionality for people logging into your system (i.e. Workers). When you give a Worker the ability to logon to your system you assign them a Role which determines the functionality and data available to them.
The Role defines the permissions for creating, editing and viewing documents owned by you, as well as those owned by other members of your organisation. For example, you can restrict the visibility of Leads so that you can view or edit only those owned by you. Moreover permissions can be specified relative to Team members or specific Offices as defined in the Worker document.
You can also specify approval permissions for Time sheets, Expense Claims as well as Sales Orders and Purchase Orders.
You can also specify which category of reports a Worker can run. For example you may wish some Workers to only have access to Purchasing reports, and no others.
In addition to permissions the Role also defines the nodes (i.e. Folders) available in the Explorer, together with the Shortcuts that are visible (See Introducing the User Interface). In this way you can tailor the User Interface to be appropriate to the type of activity the Worker will be involved in. For example if you simply want certain staff members to have the ability to fill in Time sheets and Expenses you can create a Time/Expense Role that would show only the Time/Expense Explorer node, together with the Time sheets and Expenses Shortcuts.
Similarly if you wanted your accountant to login you may configure a Role to display all folders relating to Accounting/Reporting but not Products/Services and Sales Forecasting.
NOTE:The Role Administrator is available by default and cannot be edited or deleted. The Administrator Role allows complete access to all data and functionality.
Prerequisites Using salesorder.com the basics Introducing the User Interface
Creating a new Role From the Explorer click Setup-Roles, this displays the current list of Roles. Click 'New Role', this displays a new Role Document (below).
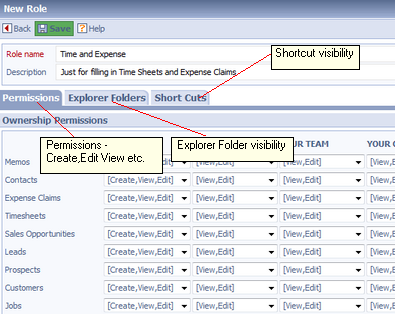 New Role showing Permissions, Explorer and Shortcut tabs
Once the Role has been created it can be assigned to a Worker from the Worker's Login Details tab (below).
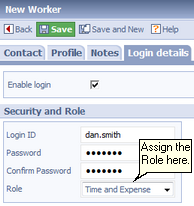 Assigning a Role to a Worker
We describe each Tab in turn below.
Permissions Tab The permissions tab is divided into 4 sections, namely
1. Ownership Permissions For all those documents that have an Owner field (i.e. they are owned by a particular Worker) this section allows you to specify the permissions for creating editing and viewing documents, depending on who owns them. For each type of document there is a row of permission values allowing you to specify permissions for different types of owner (below).
 Permitted actions based on Document Ownership
From the picture above each document that has an associated owner (in this case Memo and Lead) can be assigned permissions as follows :-
2. Approval Permissions The next section allows you to specify if the Worker has permission to approve certain documents, namely Expense Claims, Time Sheet, Sales Order and Purchase Orders. For more information on documents approval see one of
3. Sales Forecast Permissions
Choose from the drop-down to allow this Worker to produce either 'Personal', 'Team' or 'Full' Sales Forecasts. See Working with Sales Forecasts.
4. Reporting Permissions This sections allows you to specify which category of report the Worker is allowed to Run. Simply tick the boxes of the permitted categories. Note that if a report is memorised, the memorised report will be subject to the same permissions as the original.
The Role has two tabs Permissions and Shortcuts. The permissions tab determines the permissions on each Document. In the example we have called the Role Time and Expense and we are giving permissions to create, view and edit the Calendar, Memos, Expenses and Time sheets but nothing else.
Once the Role has been created it can be assigned to a Worker from the Worker's Login Details tab (below).
Explorer Folder and Shortcuts Tabs The remaining tabs allow you to specify which Explorer Folders and Shortcuts will be visible to the Worker. This allows you to craft the user interface specifically for the Role. For example you may wish to create a Time/Expense Role that only allows the entering of a Worker's Tome sheets and Expenses. The Expenses and Shortcut tabs can be used to simply the User Interface so that only the required Folders and Shortcuts are displayed (below).
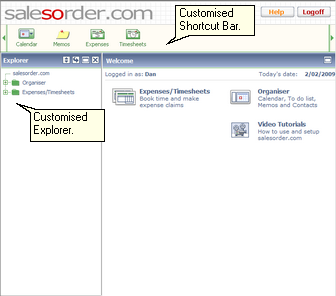 Customised UI for Time and Expense Role
Related tasks and information
|