|
Topic:
Getting Started
Spend 10 minutes reading this introduction and it will probably save you a lot of time!
To understand how to use salesorder.com you need to be aware of a few basic principles. Once understood you will find using any aspect of salesorder.com very easy because each area works in a consistent fashion.
We quickly cover 5 key areas, namely:
1. Documents
A Document is simply a Web page on which you can enter and store data about your business. All data that you hold about your business in salesorder.com is stored in Documents. So for example Customers, Invoices, Products, Tax Returns etc. are all Documents.
A Document can be in one of three states New, View and Edit.
New
When you first enter data into a Document it is displayed in its 'New' state. This is before the Document has been saved. The New state is signified by the word 'New' prefixing the Document name. For example the New Customer document is shown below.
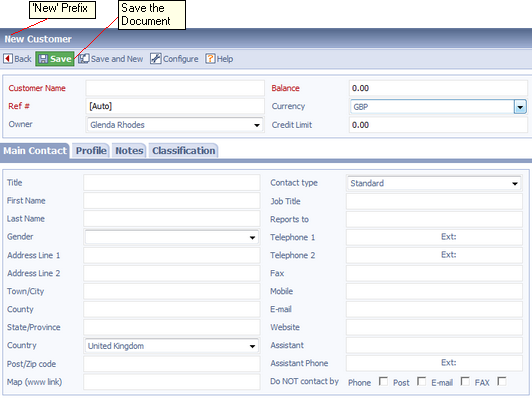
After the data has been entered the Document is saved by clicking the green 'Save' button.
View
When a Document is saved it changes state to 'View'. The View state is signified by the word 'View' prefixing the Document name. In this state the fields in the Document cannot be edited, and they typically have a grey background. A Document in View state can be edited by clicking the green 'Edit' button.
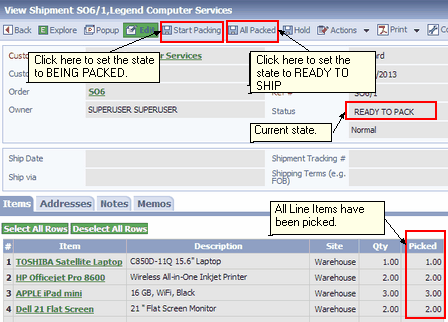
Note the Explore and Popup icons. Clicking the Explore icon will 'bookmark' the document by placing it on the Explorer in the appropriate place. This allows saved documents to be easily retrieved at any time by simply clicking the entry on the Explorer. The bookmarked document is shown below (See section 3 below).

Edit
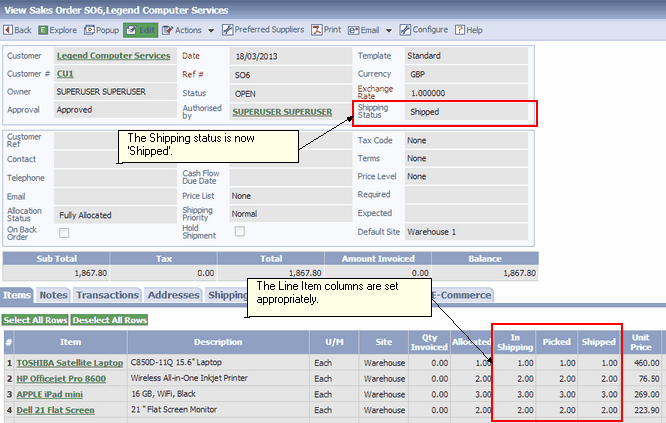
When a Document is in View state and you click 'Edit' it changes to Edit state, allowing the fields to be edited. Note that certain fields may have remained as read only, and they will keep thier grey background.The Edit state is signified by the word 'Edit' prefixing the Document name.
2. Actions
Documents represent objects in your business, Customers, Suppliers, Invoices etc. They can be created, edited and saved as described above. Actions relate to specific things you can do with the Document. The Actions associated with a Document are shown on the Documents 'Action Bar'. For example, the Action Bar for Customer is show below.
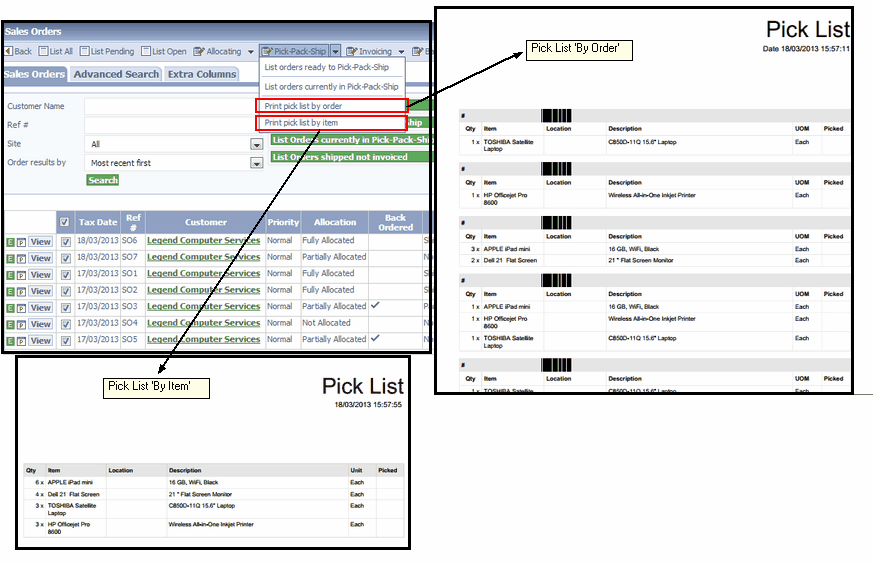
The Document Actions can either be explicit on the Action Bar, such as 'Configure'. Or alternatively they may appear in a drop down list, such as 'Actions'.
IMPORTANT: The Actions on a Document relate to that specific document. So for example in the above case clicking 'New Sales Invoice' will create a New Invoice for customer 'SO Systems Ltd'.
This underlines a fundamental principle. To perform any task simply find the related Document and click on the required Action. As another example, suppose we want to receive payment for an Invoice. First find the Invoice Document, then click the required Action as shown below.

3. The Explorer and Lists
The Explorer is a standard 'Tree' on the left hand side of the User Interface. You will notice that the tree is organized into distinct areas of your business such as Sales, Purchasing, Accounting and so on.
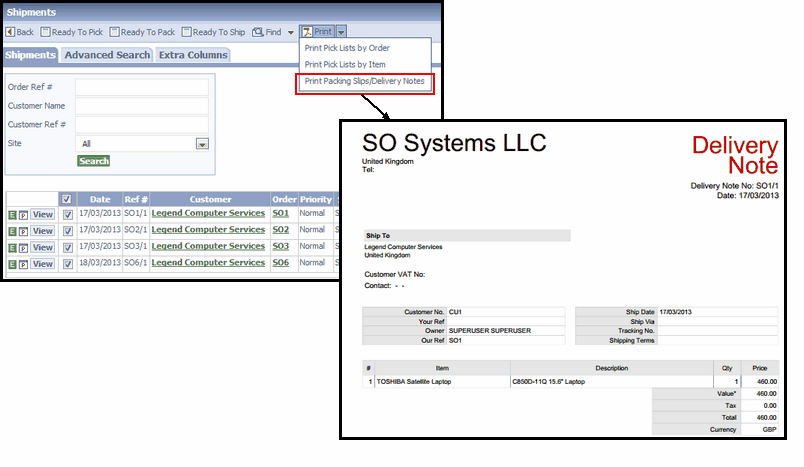 1. The Explorer tree |
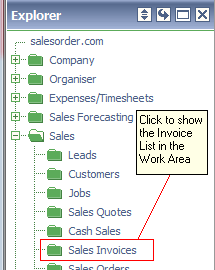 2. Viewing a List
|
By clicking on nodes in the tree you can view Documents and Lists of Documents associated with your business. For example in figure 2, clicking on 'Sales Invoices' will display the Sales Invoice List in the Work Area. Figure 3 below shows how to bookmark a Document from the Invoice List. Simply clicking on  will result in the Document being bookmarked on the tree in the appropriate place. Clicking on the bookmark at anytime will then result in the associated Document being displayed in the Work Area. will result in the Document being bookmarked on the tree in the appropriate place. Clicking on the bookmark at anytime will then result in the associated Document being displayed in the Work Area.
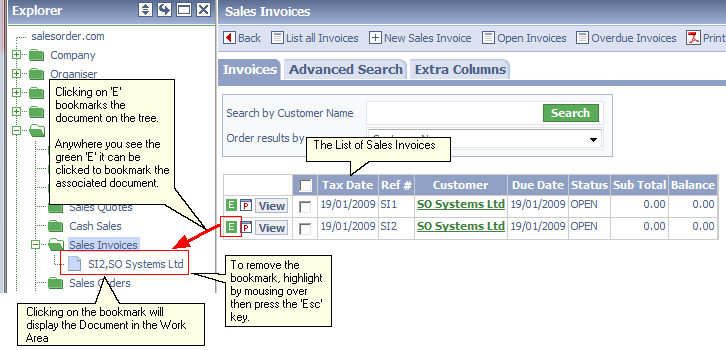 3. Bookmarking a Document from a List
In general all Documents are kept in Lists. All Lists can be accessed from the Explorer. And all Documents can be bookmarked. Bookmarking Documents is very useful for keeping track of information during the course of the working day.
4. Memos
Memos are just like 'Post-it' notes that you can attach to any Document. Memos are tightly integrated with the Calendar, and can also be specified to appear in your to-do lists. This makes them very useful for keeping track of your day to day activities. You can attach a Memo to a document simply by clicking the  icon in the Documents top right hand corner. icon in the Documents top right hand corner.
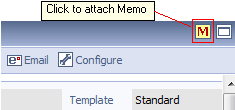 Attaching a Memo to a Document
Having clicked on the Memo icon a new Memo Document is displayed (below). Simply fill in the details and, as usual, click 'Save'.
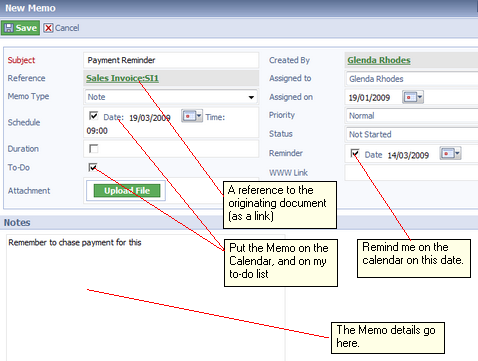 The Document Memo
After clicking 'Save' the Memo will be saved and attach itself to the original Document. This is indicated on the Document with a  icon as shown below. Clicking on this icon will display a popup of all attached Memos. icon as shown below. Clicking on this icon will display a popup of all attached Memos.
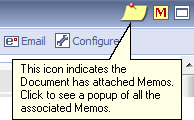 Document with attached Memos 5. Transactions and Items
As you might expect salesorder.com includes Documents for transacting your day-to-day business, such as Invoices, Quotes (or Estimates) and Sales Orders on the sales side; and Bills, Purchase Orders, Item Receipts on the purchasing side. We give all these special kind of Documents the collective name of Transactions.
Things you buy and sell in your business, whether they be products or services, are represented in salesorder.com as Item Documents. For example, if you stock and sell computers, each type of computer would be entered as a Stock Item Document. Similarly, if your company sells services, each different type of service would be entered as a Service Item Document.
Once you have set up the Items for your business you can then start to buy and sell using the Transaction Documents mentioned above. For example, for an Invoice you would first create the Invoice Document then add the appropriate Line Items by selecting from your current Item List.
As well as holding product/service information such as Item Codes, descriptions and prices/costs the Item Document also specifies accounting information that defines how your accounts are affected when the Item is bought or sold. This enables salesorder.com to automatically generate reports such as Profit and Loss/Balance sheet/Profitability and Tax (e.g. VAT Returns).
In the following example we will enter some simple Items and create a Sales Invoice Transaction. Following this example will give you a good understanding of how to use many of the Transaction Documents in the system, since they all work in a similar way.
Click on each step to show the details.
For this example we will assume your company stocks and sells computers. We want to keep track of the number of computers in stock at any time, so we use a Stock Item Document to enter our product information, in this case a Dell PC.
1. From the Explorer click Products/Services->Items. This displays the Item List.
2. From the Item List click 'New Item'. This displays the available Item types.
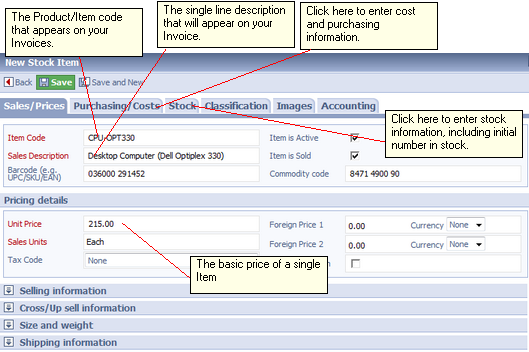
3. Click 'New Stock Item'. This creates a new Stock Item Document shown below. First, we fill in the details on the Sales/Prices tab as shown. The Sales/Prices tab allows us to enter a product/Item code together with a description. We also enter the default sale price of £215.00.
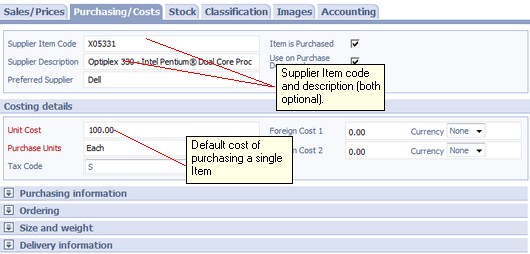
4. Next click the Purchasing/Cost tab and fill in the information as shown. This allows us to specify the supplier's Item code and description. These can be used on purchasing documents such as Purchase Orders if required. We also fill in the default purchase cost of £100.00.
5. Next click the Stock tab and fill in the information as shown. Notice that for stock we can specify the initial number on hand (i.e. available for sale), together with the associated valuation.

The Document can now be saved in the usual way.
|
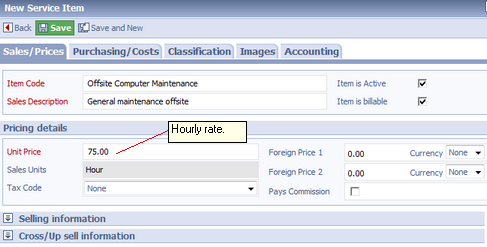
As well as selling computers let's suppose your company also sells services. In particular one such service may be 'Offsite Computer Maintenance' that we charge out at a rate of £75.00 per hour. We use a Service Item Document to enter this information as follows.
1. From the Explorer click Products/Services->Items. This displays the Item List.
2. From the Item List click 'New Item'. This displays the available Item types.
3. Click 'New Service Item'. This creates the new Service Item Document shown below. First, fill in the details on the Sales/Prices tab as shown. This is very similar to the Stock Item, but of course there is no stock! Since we do not purchase the service we do not fill in the Purchasing/Costs tab.
|
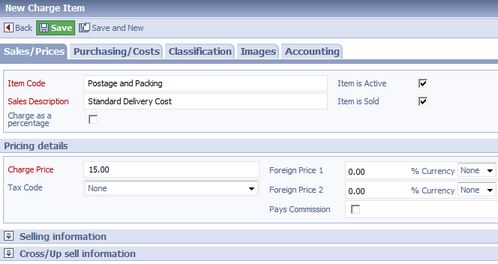
As well as our products/services we also want to enter arbitrary charges. For example delivery post and packing charges. To do this we can enter a Charge Item Document as follows.
1. From the Explorer click Products/Services->Items. This displays the Item List.
2. From the Item List click 'New Item'. This displays the available Item types.
3. Click 'New Charge Item'. This creates the new Charge Item Document shown below. First, fill in the details on the Sales/Prices tab as shown. Again we do not fill in the Purchasing/Costs tab (although in practice we may wish to enter an associated cost).
|
We have now created some Items that represent Products/Services and Charges that we buy and sell. These Items can now be used on Transaction Documents. For the purposes of this example we shall create a Sales Invoice, but the same principles apply to many Transactional Documents.
1. Before we create a Sales Invoice we need to either find the associated Customer, if it has already been entered, or alternatively create a new one. For this example we shall create a new Customer, 'SO Systems Ltd'.
From the Explorer click Sales->Customers. This displays the Customer List.
2. From the Customer List click 'New Customer'. This brings up a new Customer Document. Fill in the Company name 'SO Systems Ltd' and click 'Save'. We now have a new Customer in View mode. From the Action Bar click on 'New Invoice'. This creates a new Sales Invoice Document for SO Systems Ltd.
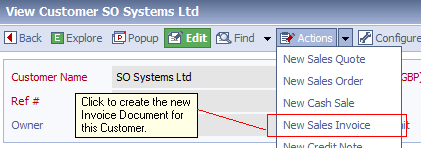
3. The new Invoice is shown below. Notice that there are many fields on the Invoice most of which are self explanatory. However the important thing here is to understand the relationship between the Items we have entered above and the Line Items we are about to put on the Invoice in the next step.
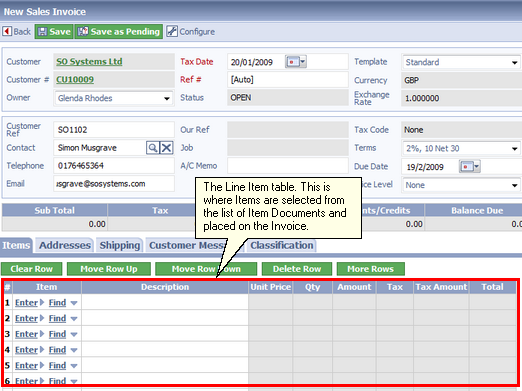 The Sales Invoice Document |
Line Items are entered onto each line of the Line Item table by using either the 'Enter' or 'Find' links. Clicking 'Enter' will allow you to enter product details directly on the line such as Description, Unit Price, Quantity etc. Alternatively, clicking 'Find' will allow you to search for Items already entered into your system, such as those entered above. As an example we now add the Computer Item entered previously.
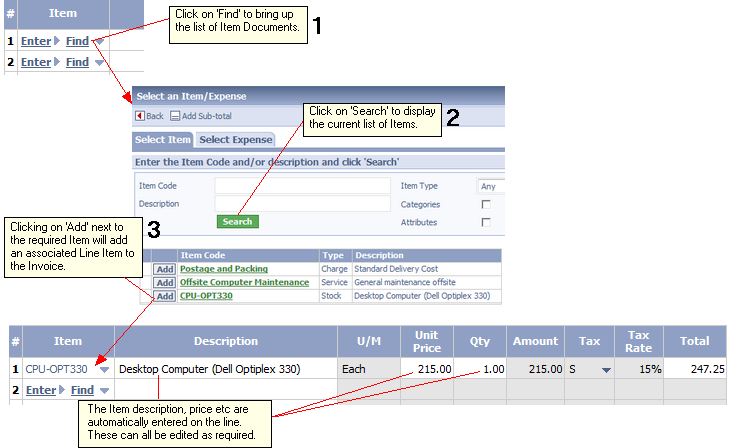
We now add the remaining line items to the invoice in a the same way. So the Line Item table eventually looks like this. Notice that we have put in a comment line that can be typed in directly. Comments are useful for annotating the Line Items with information when required.

Note: We have used 3 Items in our example. There are other Items that are also available such as Non-Stock, Discount and Markup. Also we can add Sub-total Items to sum values on the Line Item table.
|
Now the Line Items have been added we can save the Document. It can then be printed or emailed as required. The saved document is shown below.
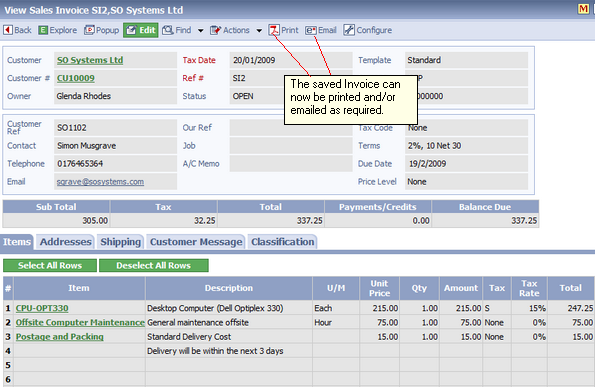
Hopefully with this simple example you now understand the basic relationship between your products/services and Items/Transaction Documents in salesorder.com.
|
6. In Summary
| 1. | All your business data such as Customers, Suppliers, Invoices, Products, Reports etc. are represented and stored as Documents. |
| 2. | Documents can be in one of three states, New, View and Edit. |
| 3. | Documents have associated Actions. To perform any task simply find the related Document and click on the required Action. |
| 4. | Documents are held in Lists, and Lists are accessed via the Explorer. |
| 5. | Documents can be bookmarked on the Explorer by clicking the  icon. icon. |
| 6. | Memos are like 'Post-it' notes, and can be attached to any Document using the  icon. icon. |
| 7. | Products and Services that you buy and sell are represented as Item Documents. Items hold basic information such as descriptions, sales price and purchase cost. They also hold accounting information. |
| 8. | Once entered, Items can be placed on Transaction Documents as such as Invoices, Quotes, Purchase Orders and Bills that you use to conduct business with your Customers and Suppliers. |
| 


