|
Topic: Setup > Plugins > Shopping Carts In this section we will describe in general terms how to use the Cart Connect Plug-in module to synchronize data to/from your Shopping Cart. No matter which Cart you are using the interface and associated method of use are more or less the same. Certain Carts may have different features implemented or missing depending on the state of the integration. To see the current state see the relevant documentation under Supported Carts.
NOTE: For the purposes of this section we will use the PrestaShop Cart as our example.
IMPORTANT: You must have the Cart Connect Plug-in enabled. If you do not, please contact Customer Services.
Installing Cart Connect on your Cart's Web Server Before you can setup Cart Connect you must first download the relevant Cart Connect Module and install it appropriately (on the Cart's Web Server). For example, the PrestaShop Cart Connect module is installed as a PrestaShop Module and can be downloaded from here. It may be that some Carts do not need any code to be installed. For more details on your particular cart see Supported Carts.
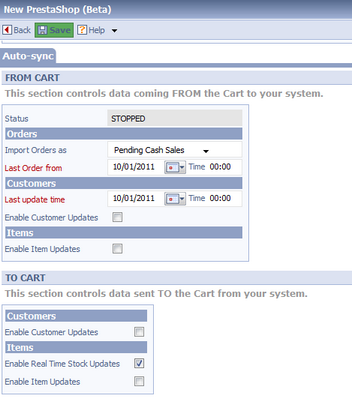
The Shopping Cart Document - quick look Before we go into detail about how to use Cart Connect we will first take a quick look at the Shopping Cart document. This is the document within your system that represents one of your Shopping Carts, and performs all the interaction with Cart Connect. The Shopping Cart document is shown below.
 The Shopping Cart Document
Referring to the picture above the Shopping Cart Document has a number of tabs to control the auto-synchronization and data export/import to/from the Cart. These are explained below.
Auto-sync This tab controls the auto-synchronization between your system and the Cart. It allows you to specify what data is to be synchronized, and from what date/time. It also allows you to start/stop the auto-synchronization process.
Orders This tab allows you to list the Orders imported from the associated Cart.
Items This tab allows you to list Items in your system and export them to the Cart.
Customers This tab allows you to list Customers in your system and export them to the Cart.
Orders (Cart) This tab allows you to list Orders in the Cart and selectively import them into your system (rather that using auto-synchronization).
Items (Cart) This tab allows you to list Items in the Cart and selectively import them into your system.
Customers (Cart) This tab allows you to list Customers in the Cart and selectively import them into your system (rather that using auto-synchronization).
Setup Overview Although the Shopping Cart document has a large number of tabs and looks quite complicated setting up your Cart to allow Orders to be automatically imported is straightforward, and consists of 4 basis steps.
1. Create a new Shopping Cart - This involves creating a new Shopping Cart document and setting up the connection with your cart.
2. Setup dates and select options - This involves setting dates from which you want to import data and selecting the various import/export options.
3. Synchronize your Items - Either export your existing Items to the Cart, or import them from the Cart so that Items on Cart Orders can be matched with Items in your system.
4. Start the auto-synchronization - Set Cart Connect to automatically import new Orders.
The following section gives step by step detail on how to set up your Shopping Cart.
Setup step-by-step Having installed Cart Connect on your Cart's Web Server (if required) you can now create the appropriate connector in your system. To do this follow the steps below :-
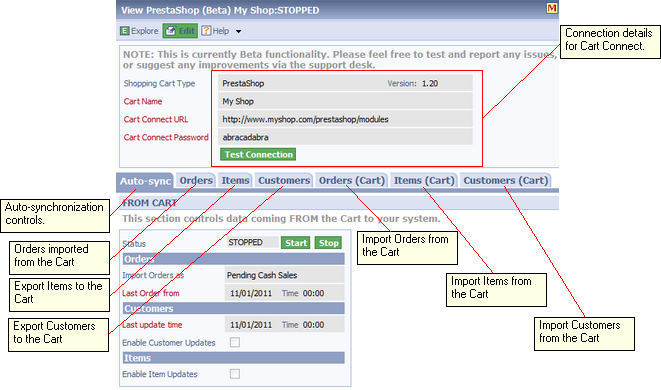
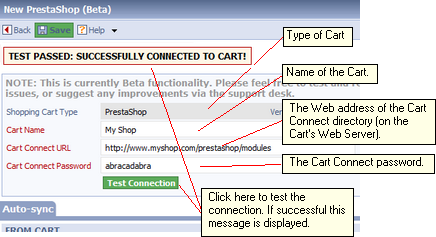
STEP 1: Create a new Shopping Cart From the Explorer go to Setup->Plugins->Shopping Carts. From the Actions drop-down select the type of Cart you wish to connect to. In out case this is PrestaShop (below).
 Creating and Connecting to the Cart.
OK. From the picture above the first thing to do is to test the connection to the Cart. To do this you must enter the web location of the cartconnect directory installed on the Cart's Web Server. In the case of PrestaShop this is the Modules directory. In the example above our Shopping Cart Website is called www.myshop.com, and the cartconnect directory is under the PrestaShop Modules directory at http://www.myshop.com/prestashop/modules. Enter the Cart Connect password (in this case set in the PrestaShop module), and click Test Connection. If all is well you will see the message :-
TEST PASSED: SUCCESSFULLY CONNECTED TO CART
You must ensure this test is passed before proceeding.
STEP 2: Set dates and select options Now you have successfully connected to the Cart you need to set certain options to control how your system will synchronize its data (below).
On the Auto-sync Tab you will notice 2 sections, From Cart and To Cart. These sections contain controls on how data is automatically sent from your system to the cart and from the cart to your system respectively. Each section is described below.
FROM CART Controls data coming from the Cart to your system. The various fields are explained below.
Status This is the current status of the auto-synchronization that automatically imports Orders and updates Customers and Items. The status values are either STOPPED or RUNNING.
Auto synchronization can be started when the Shopping Cart is in View or Edit mode (see below).
Import Orders As Select how you wish Orders from the Cart to be imported (i.e. what document in your system). The choices are Cash Sales, Sales Orders or Sales Invoice. Note all documents will be imported with a status of PENDING. This means they will not post to the accounts or affect stock until you save them.
Last Order from Set the date/time from which you want to import Orders. Any Orders before this date will not be imported. Note, this value is automatically updated by Cart Connect when Orders are imported, you only need to set the initial value.
Last update time Set the date/time from which you want to check if Customer/Item data has been modified. Note, this value is automatically updated by Cart Connect when Customers are updated, you only need to set the initial value.
Enable Customer updates Enable the automatic updating of Customer records. So if the record is changed in the cart it will automatically be changed in your system.
Enable Item updates Enable the automatic updating of Item records. So if the record is changed in the cart it will automatically be changed in your system.
TO CART Controls data coming from your system to the Cart.
Enable Customer updates Enable the automatic updating of Customer records. So if the record is changed in your system it will automatically be changed in the Cart.
Enable real-time stock updates Enable the automatic updating of Item stock levels. So if the level is changed in your system it will automatically be changed in the Cart for the corresponding Item.
Enable Item updates Enable the automatic updating of Item records. So if the record is changed in your system it will automatically be changed in the Cart.
When you have set these values as required click Save.
Before you start auto-synchronization, you can now synchronize the Items in the Cart and your system.
STEP 3: Synchronize your Items Before Orders are imported from you Cart, both the Cart and your system need to agree on the list of Items/Products. This can be done by :-
Actually if you want to it can be done by a combination of both these methods.
Importing Items from the Cart Go to the Tab named Items (Cart). This Tab allows you to list and import Items held within the Cart. To import your Items:-
a) Click on List All Items this will show all Items in your Cart. b) Using the checkboxes select which Items you want to import. c) For each Item enter the Item Code, Cost and appropriate stock level d) Click on Import selected Items to perform the import.
Rather than creating new Items by importing then from the Cart, you may have existing Items in your system that you simply want to be associated with their equivalent Items in the Cart. To do this simply click the Link selected Items rather than Create selected Items within the Items (Cart) tab.
Exporting Items to the Cart Go to the Tab named Items. This Tab allows you to list and export Items held within your system. To export your Items :-
a) Click on List all Items, this will show all the Items in your system. b) Using the checkboxes select which Items you want to export. c) For each Item enter the amount of free stock available. d) Click on Export select Items to perform the export.
STEP 4 Start the auto-synchronization OK. You should now have a set of corresponding Items in your system and your Cart. You can now start importing Orders, and the Items in the Orders will automatically be matched to the associated Items in your system.
To start auto-synchronization go to the Tab auto-sync and click the Start button (below).
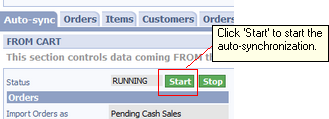 Starting auto-synchronization
Starting the auto-synchronization means Cart Connect will check your Cart about every 10 minutes for new Orders, and if it finds any automatically import them into your system (with a state of PENDING).
Linking Customers Rather than creating new Customers by importing then from the Cart , you may have existing Customers in your system that you simply want to be associated with their equivalent Customers in the Cart. To do this simply click the Link selected Customers rather than Create selected Customers within the Customers (Cart) tab.
Important operational information This section gives some important information concerning the operation of the Shopping Cart document and Cart Connect.
Automatic creation of Customers Although you can import Customers from the Cart (via the Customers (Cart) tab) they are created automatically on an as required basis when Orders are imported.
Missing Items If an Order is imported that contains an Item that has no corresponding Item in your system, then a default Item will be used in the resultant Document (i.e. as though the Item had been entered using the Enter button).
Selective importing of Orders Orders can be selectively imported from the Cart (rather than via auto-synchronization) via the Orders (Cart) tab.
Selective importing of Customers Customers can be selectively imported from the Cart (rather than via auto-synchronization) via the Customers (Cart) tab.
Related tasks and information
|