|
Topic: Sales > Working with Sales Orders If your company sells stock then Sales Orders allow stock to be reserved, or ring-fenced, so that it cannot be assigned to other orders. This reservation of stock ensures that the orders you create can definitely be fulfilled by the current stock held in the stockroom/warehouse(s). This reservation or ring-fencing of stock to a Sales Order is called Stock Allocation.
Allocation states A Sales Order can be in one of three states of allocation :-
It should be noted that just because an order is not Fully Allocated does not necessarily mean that there is not enough stock to fulfill the order. It simply means that stock has not actually been allocated to the specific order.
Why is allocation important? Allocation is important because it allows you to control which orders are fulfilled, given your current level of stock (may be across multiple sites/warehouses). If there were no allocation mechanism it would be difficult to keep track of stock both in terms of telling the customer if their order can be fulfilled, and knowing if you need to purchase more stock. Moreover it may be that given the current level of stock you may wish to fulfill certain orders in preference to others. Being able to allocate stock to orders on an individual basis is vital if you want this flexibility.
In terms of controlling stock allocation, we can do this either from the individual Sales Order, or in bulk from the Sales Order list. The latter case is useful if you are processing many orders on a daily basis for example. The next sections show how allocation is controlled in both cases.
Controlling Stock Allocation on a particular Sales Order
Let us consider a simple example using a Sales Order with 3 line items. Each line item is a Stock Item. The following picture show the new Sales Order BEFORE we have saved for the first time.
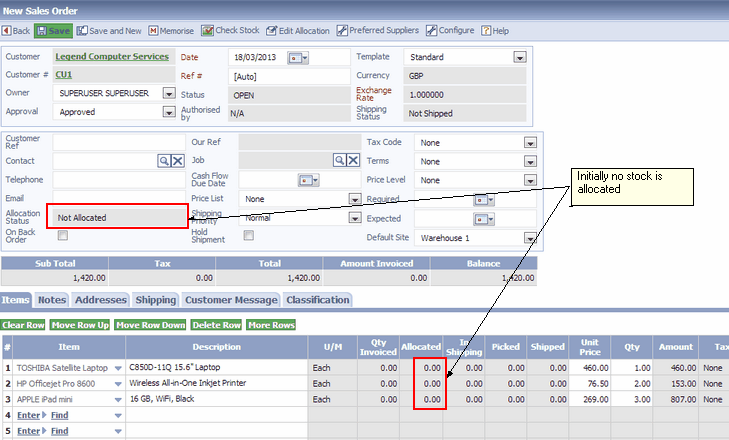 Newly created Sales Order before saving
OK now if we click Save we get the following situation...
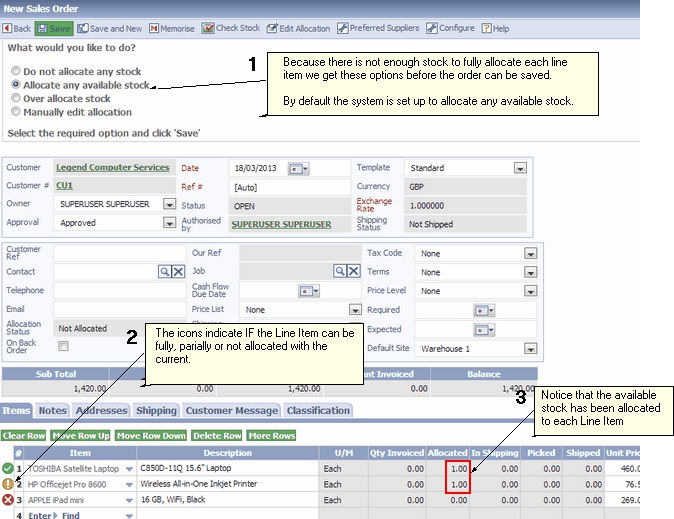 Saving a Sales Order that cannot be fully allocated
There are a few things happening here so let's take each in turn (labels 1-3 on the picture)
1. First, because the Sales Order cannot be fully allocated with the current stock levels you are presented with a number of options relating to how you would like the allocation to be handled. For example, the setting shown allocates any available stock to the line items (see box 3). However, it may be that you do not want to allocate any stock to the order, or alternatively that you wish to allocate a precise amount to each line item. Either way you simply select the option you want.
NOTE: Clicking Manually Edit Allocation will make the Allocated field on the Line Item editable. You can then set the allocation value manually.
IMPORTANT: The default option (in this case Allocate any available stock) can be set in the Sales Order Configuration page under Setup->Configuration->Sales Order.
2. The icons next to the Line Item indicate if the allocation can be fully allocated, partially allocated or not allocated at all with current stock levels.
NOTE: These icons indicate what can be done, rather than what has been done.
NOTE: If a Line Item has been fully allocated previously, and the document is in Edit mode, no icon will appear, signifying that the Line Item has been fully allocated and there is no more stock to allocate.
3. The Allocation column shows how the stock will be allocated when saved. Note that changing the options (box 1 above), will dynamically change the values in this column appropriately.
In this particular case we have chosen Allocate any available stock, and as a result line 1 and 2 have been allocated 1 unit each. Line 3 has been allocated zero units since there is none in stock.
So now we have a Sales Order that cannot be fully allocated, the first Line Item can be fully allocated, the second partially and the third not at all. It would be good if I could see the current stock levels to see how much extra stock was required. To to this simply click the Check Stock button on the action bar, and this will give you the necessary details.
NOTE: You can always display the order allocation options in New/Edit mode by clicking the action button Edit Allocation. This is useful if, for example, you want to manually edit stock levels, and simply saving the document would not have displayed the options (since all stock could be allocated).
We can now save the document in the usual way (with the option Allocate any available stock). The result is shown below.
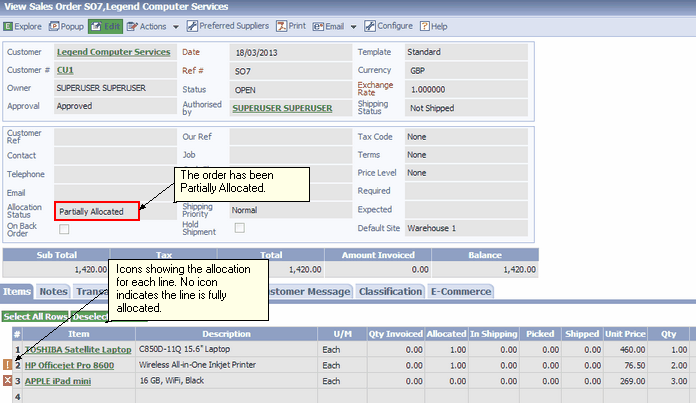 Saved Sales Order that is partially allocated
Notice how the icons change to square rather than round. This signifies what has actually been allocated, rather than what can be allocated (as in the above case when the document is in edit/new mode). If a Line Item has no icon it means it is fully allocated.
Now we want to add some more stock (typically via a Purchase Order/Bill - note that this can be done easily using a Back-Order), so that the order can be fully allocated. So let's assume that the stock has been added. When we edit the Sales Order again this is what we see.
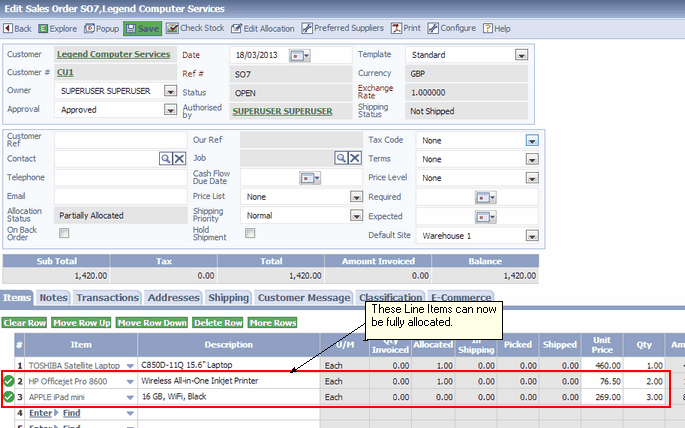 Sales Order in Edit Mode showing available allocation
The green tick icons indicate that the Line Items can be fully allocated. The absence of an icon on the first line means the line is already fully allocated.
Saving the document now would fully allocate each line. But rather than do this here, let's handle the allocation via the Sales Order list.
Controlling Stock Allocation using the Sales Order List
As mentioned above you can allocate stock from the Sales Order itself, or alternatively from the Sales Order List. This is far more convenient if you are processing many orders at once.
Let's go to the Sales Order List, and click the button List Orders requiring allocation. The result is shown below.
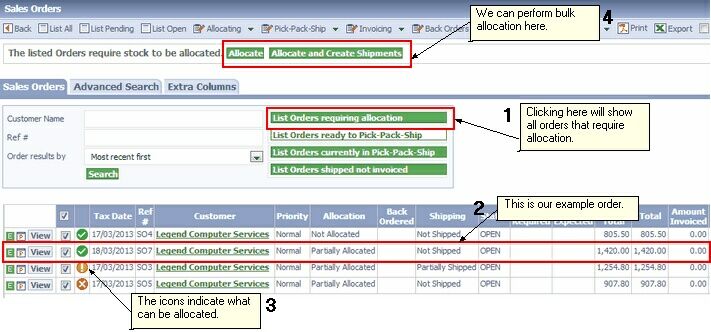 Using the Sales Order List to allocate stock
Referring to the labeled boxes in the diagram :-
1. Clicking here will show the orders requiring allocation.
2. This is the order in our above example.
3. Like the individual Sales Order, these icons have exactly the same meaning. They show what orders can be fully, partially and not allocated.
4. These buttons can be used to perform the allocation in a single click, rather than editing each Sales Order individually. For more information on Shipments, and the Pick-Pack-Ship process see Pick-Pack-Ship Process.
Selecting specific orders to allocate By default, the potential Sales Order allocation shown by the icons in the Sales Order List is done on a first-come, first serve basis. This means that allocation is performed in a particular order. However it may be that you want to allocate stock to a Sales Order further down the list that can only be partially allocated or not allocated at all with the current list ordering (i.e. orders further up the list have already 'taken' the stock).
To do this simply select the Sales Orders you wish to allocate, then from the Allocating action drop down click on Show allocation for selected orders. This will list only the selected orders with the associated allocation icons. Given the new list order, it is now possible that stock that could not previously be allocated can now actually be allocated (of course it is also possible that there is still not enough stock!). The diagram below shows how this works.
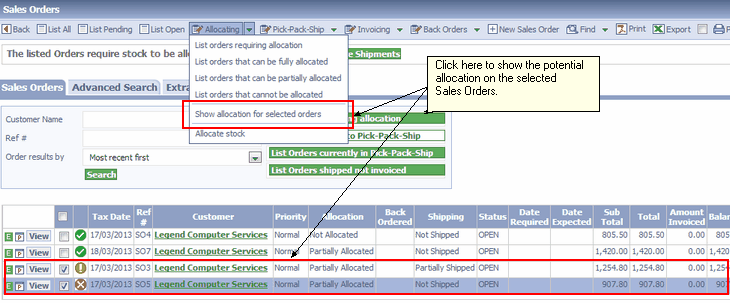 Showing allocation for selected Sales Orders
Related tasks and information Allocating Stock to Sales Orders Drop Shipment and Special Orders
|