|
Topic: Setup Customer payments can be taken directly using Credit Card and/or eCheck. The payment can be taken from within your system either from a Cash Sale or a Customer Payment document. Alternatively, Customers can make their own payments via the Customer Portal.
Payments are handled by Payment Processors which are third party services that handle the actual money transaction to and from a designated bank account. Examples of payment processors are PayPal and Authorize.net. There are of course many more available, and indeed we will be continually adding to the list of supported Payment Processors. The current list of supported Processors is given here.
Processing Methods Depending on the type of Payment Processor there are essentially two different ways that payments are processed. These are Immediate Payment Notification (IPN) and Integrated Payment (IP).
Immediate Payment Notification (IPN) In this method a popup form is used to capture the Credit Card Details. This form is actually hosted by the Payment Processor company (e.g. Authorize.net). When the payment is completed your system automatically receives notification from the Payment Processor of whether the payment has been successful. If it has the status on the originating document (e.g. Cash Sale or Customer Payment) is updated appropriately.
Integrated Payment (IP) In this method there is no popup form or notification. Instead your system communicates directly with the Payment Processor in a seamless fashion. When the payment request is received the status on the originating document is updated immediately.
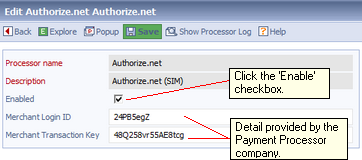
Enabling a Payment Processor Before you can accept payments from Credit Cards etc. you must enable at least one Payment Processor (otherwise the payment cannot be processed!). This is a simple task, we will use Authorize.net as the example (below).
1. From the Explorer got to Setup->Payment Processors. This lists all the currently supported Payment Processors.
2. View and then Edit Authorize.Net (below)
 Enabling a Payment Processor
Note that the Payment Processor will typically require information to identify your account. In this case when you sign up with Authorize.net they provide a Merchant Login ID and a Merchant Transaction Key. You must enter valid information here otherwise you will not be able to process payments.
3. Click the Save button. The Payment Processor is now enabled. We now assign the processor to a Currency. In this way all payments in the specified Currency will be handled using this processor by default.
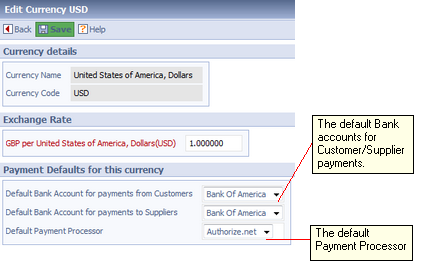
4. In this example from the Explorer go to Accounting->Multi Currency->Currencies and edit the currency USD (below).
 Setting the default Payment Processor
Note that not only do we set the default Payment Processor for this currency, but we can also optionally set the default bank accounts for payment from Customers and to Suppliers.
5. That's it! Now any payment form a Customer in USD will be handled using Authorize.net by default. Of course you can override the default Payment Processor either on the Customer or Customer Payment Documents.
NOTE: You can enable multiple Payment Processors. If required you can have different currencies handled by different processors.
NOTE: If you want to to add a new Payment Processor that we do not currently support please get in touch with Customer Services.
How to process a payment by Credit Card For information on how to actually process payments see Processing Credit Card Payments
The Payment Processor Log All data send and received by a particular Payment Processor is logged in your system. This can be useful to see, for example, the reason for payment failure. For more information about the Payment Processor Log click here.
Related tasks and information Processing Credit Card Payments |