|
Topic: Setup > Configuration In certain circumstances you may wish to add new Fields to a particular document that are specific to your company's requirements. For example, you may wish to add a Date Of Birth field to the Customer Document, or may be a How Did you find us drop down list on the Prospect Document.
The Customisation facility allows you to add custom Fields, Sections and Tabs to virtually any Document in your system, thereby giving you the ability to tailer salesorder.com to your specific needs.
Do not be deterred by Customisation, its actually very easy. So here is a quick example to take you through the process.
NOTE: You need to have Administrator privileges to customise documents.
NOTE: When Custom Fields are defined for a particular document they will be visible from the associated document's List via both the Advanced Search and Extra Columns tabs.
NOTE: Custom fields can be specified when importing data.
A Simple Customisation Example First we are going to add a Date Of Birth field in the Customer Profile tab.
Step 1: Display the Customer Configuration page From the Explorer find the Customer Configuration screen by clicking on Setup->Configuration, then clicking on Customer under the Sales heading. The Customer Configuration page should now be displayed.
Step 2: Display the Customisation screen From the Action bar click Customise Fields. This will display the Customer Document in Customisation Mode.
Step 3: Select where you want to add the new field Now, we want to add the new field under the Profile Tab. Click the Profile Tab, and you will notice that as you mouse-over the fields they highlight in blue. We are going to add the DOB field under the existing Customer Since field; so put you mouse over this field and click to select. The field will now be highlighted in blue.
Step 4: Add the new field From the Action bar click on Edit Fields and select Add Field Below. A new small window will now appear allowing you to set the details of the new field. From the Field type select Date. Notice that there are lots of different types of field that can be added. See below.
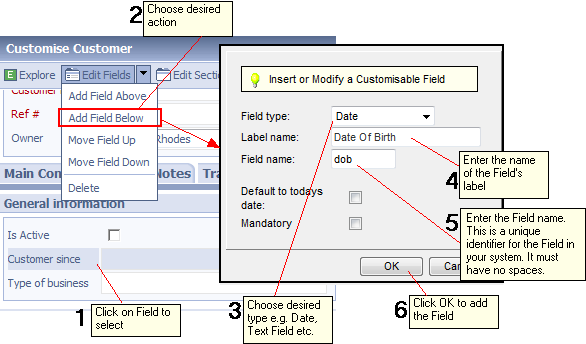 Adding a new Field
Step 5: Complete Field details and save Each type of Field has its own set of information to be completed, but common to all fields is the Label name, and the Field name. The Label name is simply the label that appears next to th the Field.
Field Name The Field name is a unique name that is associated with this Field. This name is used to uniquely identify the Field within your system. Clicking OK will close the window and add the Field to the Custom Document in the desired location (below).
 New Field added with edit icon
Notice that next to the the new field is an edit icon. Clicking this icon will bring back the edit window for this Field.
Step 6: Done! Now the Field has been added the next time you create a new Customer the new Date Of Birth field will appear in the appropriate place.
Deleting Custom Fields Custom Fields that you have added can of course be subsequently deleted. To do this simply select the Field in the usual way and click Delete Field from the Edit Fields drop down.
IMPORTANT: If you delete a Custom Field that has previously been populated with data, the associated data will be permanently lost on deletion.
Adding Custom Sections and Tabs As well as Fields you can also add Custom Sections and Custom Tabs to your Documents.
Related tasks and information Configuring the Extension Module
|