|
Topic: Setup > Configuration > Customisation Sometimes you may have a number of related Custom Fields that you want to add to a Document. In this case you can add a whole Custom Section, and if required give the section a title. You can subsequently add you own Custom Fields to the new Section.
In this topic we show you how to create a Custom Section by way of example. We are going to add 2 new Sections to the Lead Document. First a Section in the Header that has no title but will include Fields for Exhibition name and Brochure Sent . Secondly a Section on the Profile tab will contain Extra Personal Info including the Date of Birth and Salary.
Prerequisites
Adding a Header Section Pages in salesorder.com usually have a Header Section, which is permanently visible, together with a set of Tab Panels underneath, which become visible when the Tab title is clicked. There are exceptions to this in that some objects may have no Tabs, or indeed Tabs but no Header Section.
To add a Header Section to the Lead Document follow the steps below.
Step 1: Display the Lead Configuration page From the Explorer find the Lead Configuration screen by clicking on Setup->Configuration, then clicking on Lead under the Sales heading. The Lead Configuration page should now be displayed.
Step 2: Display the Customisation screen From the Action bar click Customise Fields. This will display the Lead Document in Customisation Mode.
Step 3: Add the new Header Section From the Edit Sections drop down click on Add Header Section (2 Columns). Note that the Header Section on Lead has 2 columns of Fields, which is why we chose the 2 column header option. Once the action is clicked a new Header Section will be added to the Lead Customisation screen, as shown below.
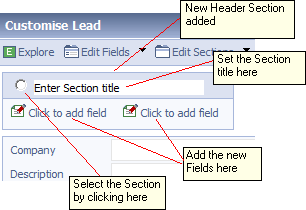 Adding a Custom Section
Step 4: Entering the Section title When the Section is added you will notice an input text field on the title strip. If this is set blank then the Section will have no title and no title bar, otherwise it will be given the specified title. Clicking outside the input field will refresh the page store the updated title.
Step 5: Adding Custom Fields To add Custom fields simply click on the edit icon and add in the usual fashion. (see Customisation for details on how to do this). More Fields can then be added to each column in the usual way (see below).
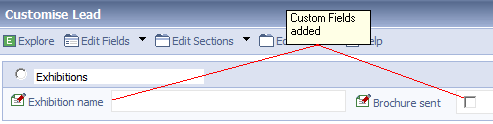 Adding Fields to a Custom Section
Step 6: Moving the Section You may not want the section to be at the top of the Header. To move the Section down first select it by clicking on the radio button in the title bar. Then from the Edit Section drop down click Move Section Down. The section will be moved down accordingly.
Step 7: Done! Now the Section has been added the next time you create a new Lead the new Header Section will appear in the appropriate place (see below).
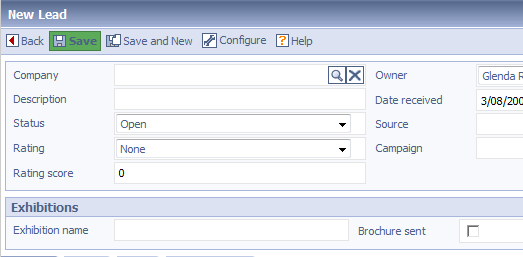 Custom Section included in new Lead
Adding a Section to a Tab Adding Sections to a particular Tab is done in much the same way as above. Simply do the following,
Step 1: Select the Tab to you wish to add the new Section
Step 2: Add the Section as above but use Add Section... rather than Add Header Section...
NOTE: You can add Sections to Documents having no Headers or Tabs using Add Section...
Deleting Custom Sections Custom Sections that you have added can of course be subsequently deleted. To do this simply select the Section in the usual way and click Delete Section from the Edit Sections drop down.
IMPORTANT: If you delete a Custom Section that has previously been populated with data, the associated data will be permanently lost on deletion.
Related tasks and information |