|
Topic: Setup Salesorder.com allows you to import data, such as Customers, Suppliers, Items, Accounts etc. from Microsoft Excel. You may want to do this because,
Whichever reason is applicable to you the same basic mechanism is used to upload the data. We shall describe the basic mechanism here.
IMPORTANT: Importing data into salesorder.com can be quite complex, depending on the extent of what you want to import. For this reason we strongly recommend viewing the associated video tutorials before attempting to import data into your system. Click here for more information.
A simple example: Importing Customers As a simple example we will import a list of Customers. The mechanics of importing other types of Document, such as Items or Accounts etc. is essentially the same.
Step 1: Download the Excel Template. Go to the Import Data page and download the appropriate Excel Template (we have provided templates for all up-loadable Documents). From the Explorer click Setup->Import Data. This displays the Import Data page (below).
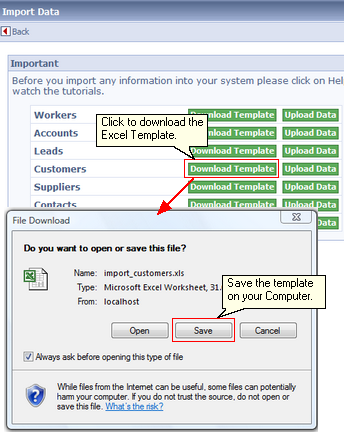 Downloading the Excel Template
Click on 'Download Template' next to 'Customers'. A window will now popup allowing you to download and save the Excel Spreadsheet on your computer. Save the spreadsheet in an appropriate place on your computer.
Step 2: Open the Excel template and fill in the data. Open the saved Excel spreadsheet, and locate the 'Customers' tab. This is where you can fill in your Customer data (below).  Entering your data in Excel
Note that the columns are either yellow or grey. Yellow signifies a mandatory column that must be filed in. Grey columns are optional. To see information on the column values mouse over the red icon
IMPORTANT: Do not remove or add any extra columns to the the spreadsheet. This will cause the import to fail.
Now simply add the required data, one row per Customer. When you have added all the data, save the spreadsheet.
USEFUL TIP: We recommend uploading a single row initially. When you are happy with the upload process you can then confidently upload more data.
Step 3: Upload the saved data. Having saved the spreadsheet you can now upload the data into salesorder.com.
Return to the Import Data page. Now click 'Upload Data' on the Customers row. This will popup an upload dialog box. Either type in or locate the saved spreadsheet using 'Browse', then click 'Upload'. This will upload your data (below).
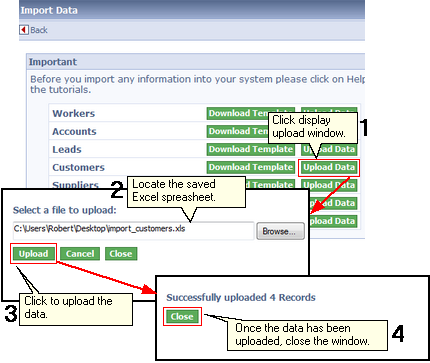 Uploading the saved Excel Speadsheet
NOTE: Depending on the amount of data, it may take some time to upload. Please be patient!
Importing Custom Fields If you have defined Custom Fields in a particular document such as Customer, you may wish to import values into these fields when using the import spreadsheet. This is easy to do. Simply append columns to the desired template, and use the Custom Field's fieldName as the column header name.
|