|
Topic: Banking > Working with Bank Accounts > Working with Checks Checks within salesorder.com can be printed on blank check stock such as QuickBooks Voucher Checks. Which can be readily obtained from stationers, or ordered over the Internet.
IMPORTANT: You must download and install the freely available Adobe Acrobat Reader to print the PDF documents containing your checks.
NOTE: Currently, salesorder.com only supports printing QuickBooks Voucher Checks. More check types will be added as and when they are requested. If you need to print on different types of check please send us a support request with details of the checks you require.
IMPORTANT: To print checks properly it is important that your printer is set up correctly. As an example see the picture below. This window is shown when you try to print a document (on MS Windows operating systems).
 Printer setup for printing Checks
NOTE: Checks can only be printed if the user's Role has Checks enabled.
How Checks are printed Checks are printed by first selecting which checks you wish to print (each check to be printed must have its 'To be printed' flag checked), then generating a PDF file that can be downloaded and printed. The PDF file contains the check information in the correct format to be printed onto your blank checks.
When the checks are printed salesorder.com asks you if the checks were printed correctly, or how many were printed correctly if there has been a printing problem. Depending on the answer the printed checks are flagged as PRINTED within your system. This ensures you do not inadvertently print duplicate checks.
Checks can be printed from a number of places, namely :-
No matter which method is chosen the same Print Checks page will appear (below).
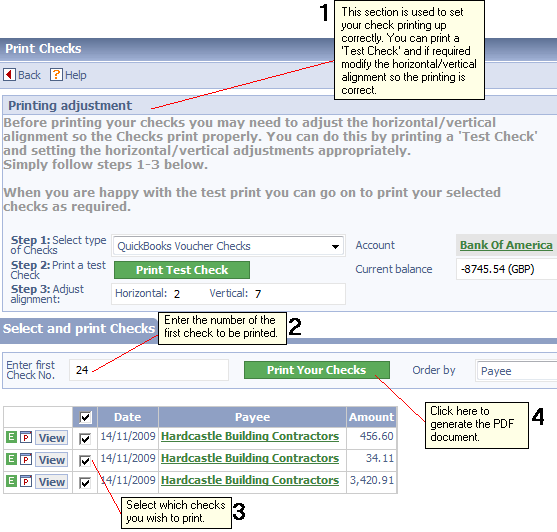 The Print Checks page
To print your checks follow the steps below.
Step 1: If this is the first time you have printed checks using your current printer you may need to adjust the horizontal/vertical alignment so that the checks print correctly. The first section Printing Adjustment allows you to print a Test Check and set the horizontal/vertical adjustment accordingly. To do this follow the steps shown :-
NOTE: When you are happy with the alignment and after you have printed your real checks, salesorder com will remember the horizontal/vertical alignment settings so that you do not need to repeat the above procedure.
STEP 2: Under the tab Select and Print Checks enter the number of the first check to be printed.
STEP 3: From the list of checks select which ones you want to print.
STEP 4: Click button Print Your Checks. This will generate the PDF document containing your checks and display the Check Download Page (below).
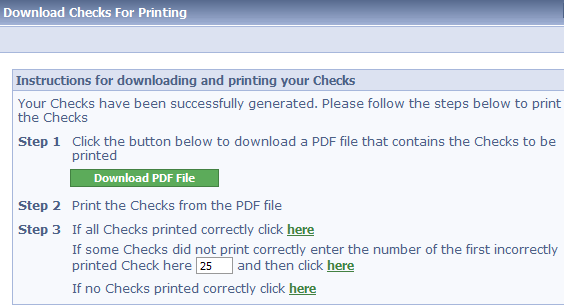 Check Download Page
The download page enables you to download and print the PDF documents containing the checks. After you have printed your checks you must indicate whether the printing was successful so that the check statuses can be updated appropriately within your system. The steps are described below.
STEP 1: To download the PDF document click button Download PDF File. This pops a window containing the associated PDF file.
STEP 2: Load the checks into your printer, and print the downloaded PDF document. If the test check printed correctly then similarly all the checks printed here should also print correctly.
STEP 3: After attempting to print the checks in STEP2 there are 3 possible outcomes.
Related tasks and information |