|
Topic: Sales > Working with Customers For those Customers who have an account with your Company you may wish to generate regular Statements that show the current balance and a list of the transactions that have occurred during a certain period. Salesorder.com allows you to print and email individual Statements, also it allows you to bulk print a set of Statements.
NOTE: All generated statements are given a unique Ref # and stored. This means the can be retrieved at a later date if an issue needs to be discussed with one of your Customers.
Generating a Single Statement To generate a single Customer Statement simply find the Customer from the Customer List and from the Customer's Action Bar drop-down click 'Create Statement'. This will display the Create Customer Statement Page (below).
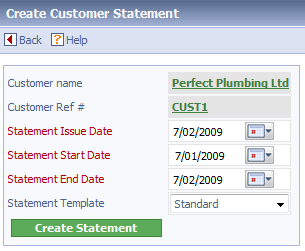 The Create Customer Statement Page
The fields are fairly self explanatory, apart from Statement Template. The Statement Template allows you to configure the layout of the printed Statement document, in much the same way that you can configure the print format for say a Sales Invoice. You can create as many templates as you require, see Working with Document Templates for more details.
Having decided on the Issue, Start and End dates click 'Create Statement' to generate the Customer Statement (below).
This will create a new Customer Statement with the specified dates, and show all the associated transactions. Notice that any Open Invoices (i.e. partially paid or unpaid) will always be displayed.
The Billing Address tab contains the address to which you want to send the Statement. This will be the default Billing Address defined in the associated Customer Document (see Entering Billing/Shipping addresses).
NOTE: Because the Statement has not yet been saved you can still choose the Statement Template.
NOTE: The Ref # field has been set to [auto], and it is read only. This will generate a unique identifier for the Statement. This number can be used as a reference when discussing the Statement with a Customer.
Once saved the Statement can be printed or emailed, in a similar way to other Documents such as Sales Invoices. For more information see Working with Emails and Printing Documents.
Bulk printing Statements from the Customer List Sometimes you may wish to generate and print a number of Customer Statements together, rather than going through each Customer one at a time. This can be done from the Customer List in the following way (below).
Step 1: Generate the Statements
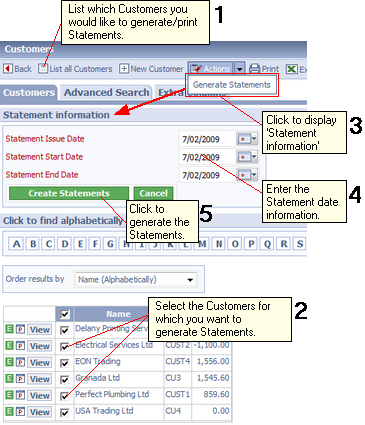 Generating Statement from the Customer List
The steps in the diagram show how the Statements are generated (i.e. before printing).
Step 2: Print the Statements The Statements can now be printed from the Statement List.
IMPORTANT: You must have Adobe Acrobat Reader installed to view PDF Documents.
NOTE: By Printed we mean downloaded as a Adobe PDF document that can subsequently be printed.
 Printing from the Statement List
The steps in the diagram show how the Statement are printed to PDF.
Related tasks and information Working with Document Templates Entering Billing/Shipping addresses Emailing Invoices and Transactional Documents
|
