|
Topic: Purchasing
The Payment to Supplier Document has three purposes:
IMPORTANT: If you use the Action 'Make Payment' on the Supplier Document, the Payment to Supplier Document will display all of the Bills with outstanding balances for this Supplier. If you use the Action 'Make Payment' on a Bill Document, the Payment to Supplier Document will only display this Bill.
Prerequisites Using salesorder.com the basics Working with Bills (Supplier Invoices)
Creating a 'Payment To Supplier' Document The Payment to Supplier Document can be created in two ways. Either from the Supplier Document, or from a specific Bill. In both cases this is done by clicking the 'Make Payment' action from the Action drop-down on the corresponding Document.
NOTE: Both these methods result in s similar Payment Document, however if you make payment to a Supplier you can pay all outstanding Bills. Conversely, if you make payment from the Bill you only make payment for that specific Bill.
In this description we will assume you have clicked 'Make Payment' from the Supplier Document. The same details apply equally well to the specific Bill payment.
The Payment to Supplier Document is shown below. The steps for completing the payment are labeled 1 through to 8. This is not as complicated as it looks! since in most cases you can simply use the pre-filled values We have just used an example that, as well as cash payments, also allocates credit from a Supplier Credit Note.
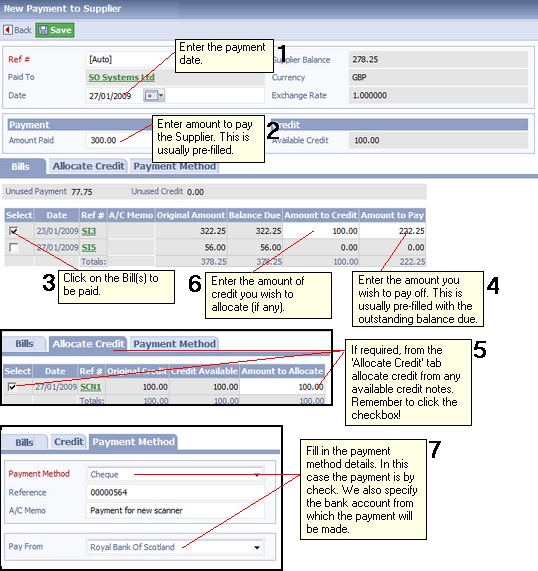 New Payment to Supplier Document
From the diagram above we will detail each step below.
1. Enter the date of the payment. This should be the date the payment actually left you account.
2. Enter the actual amount you have paid. This field is pre-populated with the outstanding amount owed on open Bills, so in most cases you may not need to actually enter anything here.
3. Click on the 'Select' checkbox for the Bill or Bills you which to pay. When you click the checkbox you will notice the associated 'Amount to Credit' and 'Amount to Pay' fields become editable.
4. Enter the amount of cash you want to pay against the Bill. This is cash from the 'Amount Paid' field. NOTE: If you pay less total cash than the 'Amount Paid' the difference is displayed in the 'Unused Payment' field. Again when you first create a payment the amount of cash paid is already entered by default.
5. Click to the 'Allocate Credit' tab. In a similar way to the Bills, this displays the currently available Supplier Credit Notes. As with the Bill, click on the appropriate 'Select' checkbox to make the 'Amount to Allocate' field editable. Then simply enter the amount of Credit You wish to allocate. In this case £100.
6. Now we allocate this credit to the Bill. Go back to the Bills tab and enter the £100 credit in the 'Amount to Credit' field. At this point we have paid the full Bill amount i.e. £100 + £222.25 = £322.25.
7. Now we need to enter details of the payment. Go to the 'Payment Method' tab. We enter the payment method, which is a cheque, and a Reference which in this case is the cheque number. We also specify the bank account from which the payment will be taken.
8. That's it! All you need to do now is save the Document. Of course this example has been made more complicated because of the assignment of credit.
Related tasks and information Working with Supplier Credit Notes
|