|
Topic: Products/Services > Working with Items In certain cases a particular product may have a number of different variants, each of which is represented by a distinct Item. For example if you sell Shirts the same basic shirt may come in three different sizes (Small, Medium, Large), and three different colors (Red, Green, Blue). A convenient way to represent this set of related Items is to use a Matrix Item.
A Matrix Item allows you to create and group together all the related Matrix Combinations (i.e. separate Items). This makes creation and editing of the different combinations easier than if the associated Items were created one by one.
NOTE: Any Item can be designated a Matrix Item when it is created i.e. a Matrix Item is not a distinct Item in its own right. So for example, you can have Matrix Stock and Service Items, and you can even have Matrix Discount/Markup Items.
Matrix Item Example Lets go through a simple example to show how Matrix Items work. We will use Shirts as the basic product.
STEP 1: Creating the required Attributes First set up two attributes called Color and Size. The Color attribute can have values Red, Blue and Green. The Size attribute can have values Large, Medium Small. For more information on Item Attributes see Working with Item Attributes
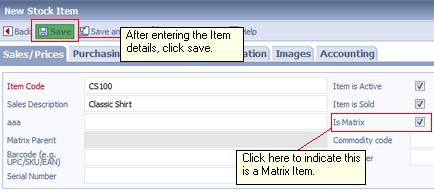
STEP 2: Create the Matrix Master Item Create a Stock Item (or Non-Stock if you prefer) with Item Code CS100 and description Classic Shirt. Before saving, make sure you click the Matrix Item checkbox is ticked. This indicates that the Item is indeed a Matrix Item (below). Enter the remaining details and save the Item.
 Creating a Matrix Item
After saving the Item you will notice 2 things. First the Matrix Parent Field indicates this is the Matrix Master, secondly a Matrix Tab has appeared, this shows the different Items corresponding to combinations in this Matrix. Initially there is only one Item combination, which is the Master itself (below).
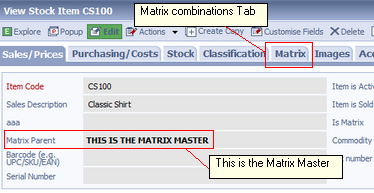 Master Matrix Item
STEP 3: Add Matrix Combinations Now we have created the Matrix Master we can add Item combinations based on different attribute values. Click on Edit and go to the Matrix Tab (below).
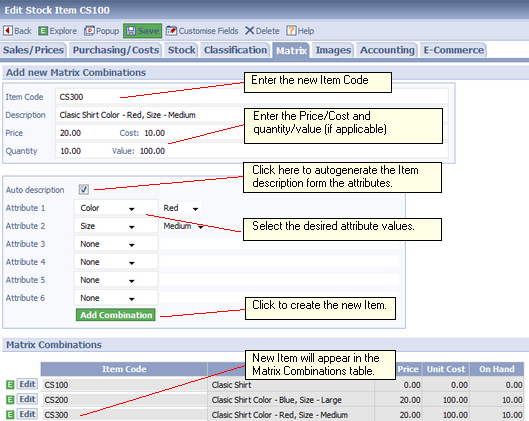 Adding a Matrix Combination
As you can see adding Matrix combinations is easy. Simply enter the new Item Code (remember the combination is a new Item), select the required attribute values and click on Add Combination. The new Item will automatically appear in the Matrix Combination Table.
NOTE: The new Item will inherit all the values from the Item it is created from (including account mappings etc). If you want to change these values simply change them in the Item before clicking Add Combination.
OK. We have now created a simple Matrix Item and added some Matrix Combinations. Notice that you can edit any of the combinations by clicking the corresponding Edit button. Moreover you do not have to use the Matrix Master to create more combinations. You can do this from any of the Matrix combinations as well.
Related tasks and information
|