|
Topic: Setup > Plugins > Shopping Carts > Supported Carts Installation and setup To install and setup Cart Connect for BusinessCatalyst simply follow the steps below.
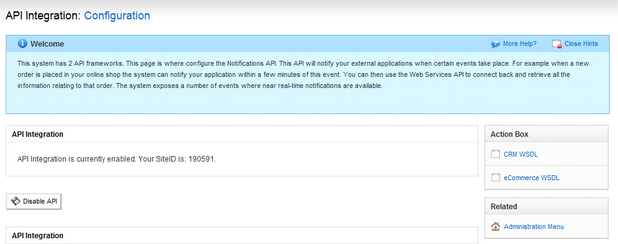
STEP 1: Configure Business Catalyst Webservice.
Login into your BusinessCatalyst administrator console. Go to Admin->API Configuration. Click on Enable API. Save SiteID, it will be used in salesorder.com configuration.
Image 1: Enabling API STEP 2: Configure Cart Connect in your system.
You must ensure that Cart Connect is enabled for your system. If not contact Customer Services.
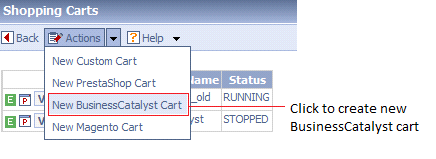
From the explorer go to Setup->Plugins->Shopping Carts and create a New BusinessCatalyst cart (below).
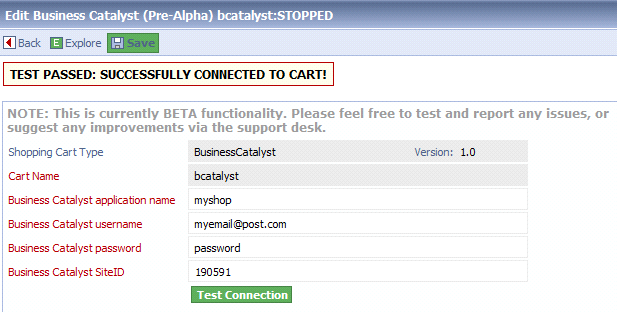
This creates a new Cart Connector to a BusinessCatalyst Cart. To complete the connection you need to fill in a few details as shown below.
Business Catalyst application name is part of your BusinessCatalyst cart address. If your cart is under http://myshop.businesscatalyst.com/, in this field enter “myshop” (without quotes). Business Catalyst user name is username you used to login into administrator console.
Business Catalyst password is password you used to login into administrator console.
Business Catalyst SiteID is number generated in STEP 1.
By clicking on the Test Connection button you can see if the credentials are correct. If they are you will see the message TEST PASSED: SUCCESSFULLY CONNECTED TO CART appear at the top of the page.
Once the connection test is passed you can save the Cart and begin using Cart Connect.
For more information on the general use of Cart Connect click here.
Related tasks and information Working with your Shopping Cart
|